Saturday, March 26, 2011

Tool Cabinet - Part 3 - Those wascally wabbets (and dados)

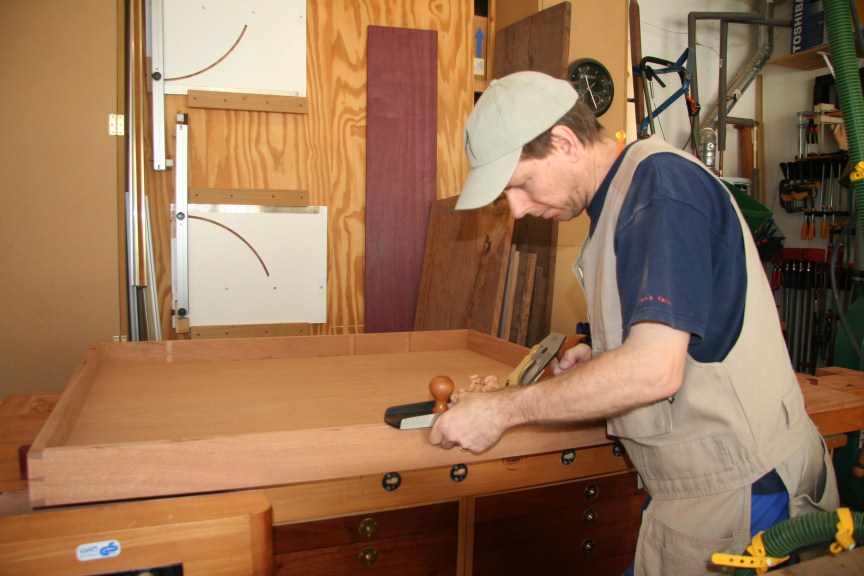
The box has been put together and now it is time to put the front and back panels on. I had to created a rabbet all the way around the front and back of the carcass. This wasn't at all enjoyable. I'm not a big fan of routers (especially when not mounted in a table). The end result wasn't pretty. Fortunately this will all be covered up with faux rails and stiles.  Balancing the router on such a narrow piece was a challenge.  I made a fence to help. You can see the hamster bed being created at the bottom of the carcass.  I had already cut and installed the back before taking this picture.  Thus, the clippings were being captured inside the box.  My 2-year old daughter (at the time) saw all the dust and asked me if I was making a sandbox.  In this shot I'm cutting the front rabbets. After that the panels just drop in place and get screwed in.


After closing up the box it's time to cut the front off.  This was a challenge to say the least. Keeping things up against the fence proved difficult.  I put some feather boards on the saw but the box was too much for them.  My 12-year old son was on the outfeed side of the table saw ready to catch it.  I started by slicing the top and bottom all the way through.  Once those cuts are made I stuck some boards ove the cuts I just made using double-sided tape. (note to self - don't buy anymore tape from Big Lots).  This holds the box together so when you cut the sides things don't fall apart. The third side cut easily. The fourth - well - buy better tape next time (or use a glue gun).


After the front face has been cut off the edges need to be cleaned up. I then cut the front face in two to form the two doors.  Unfortunately I didn't get a picture of that but you get the idea.


The doors have been put aside while work gets done on the inside. There will be three columns for drawers at the bottom (the original plan has two).  I added a narrow/tall middle drawer to hold my glue bottles and oil cans.  In this shot I'm cutting stopped dados to receive the vertical dividers for the drawers. The shelf above the drawers will receive the same stop dados on the underside.  You start by marking your location and scribing lines with a knife. Then it's simply a matter of sawing down to the required depth. I just clamped an 8/4 piece of maple scrap (cutting board leftover) on the line and using my x-cut saw (Bad Axe Gloat!) sawed away.  (Update:  I've since realized that cutting stopped dados by hand isn't all that intuative.  I will vlog my approach at a future date.


After the outsides of the dados have been formed it's time to clean out the waste.  There is no better way to do that than with a router plane. That's got to be one of my favorite tools.  I chiseled out the waste at the stop portion of the dado down to depth to prevent blowing out the edge with the router plane. This shot is taken from the back.


You've gotta love it when you can get cross grain curls like this with a router plane.


The dados are cut a tad bit narrow so you can sneak up on them with the side rabbet plane.


Next up - I spent the day dimensioning the lumber for the shelves and drawers. There will be a total of 7 drawers (mahogany sides and birdseye maple fronts. I'll be using half-blinds on the drawers (sort of). Things are going slowly right now because I'm finishing the inside of the cabinet in the process. I am no finisher that's for sure.

Saturday, March 19, 2011

Tool Cabinet - Part 2b - More dovetails galore!

I start the long and tedious work of banging out the waste between the tails.  I've never been accused of being all that quick at the bench but holy smokes. I was worn out at the end.  I had to go back to the stones several times when all was said and done.


I finally got the waste on the tail boards cleaned out. This is the setup for marking the pins. This is where the 140 trick really earns its keep. It made this setup sooo much easier. I just slid the tail board up until it locked into the edge of the pin board.  I then clamped it down to the bench. The box of my Lie-Nielsen No. 8 (pictured under the tail board at the back of the bench) was almost the perfect height for supporting the board. Lesson learned - always keep your LN boxes.


I skipped the boring details of documenting the pin cutting/chiseling.  It's pretty much the same as the tails.  So now... the long awaited final product. I forgot to take pictures during the assembly process. That was interesting to say the least.  As I mentioned earlier I'm a Cosman graduate so I was taught - no test fitting.  Boy was I nervous.  I didn't want to spend 1/2 day cutting out the tails/pins and then I get a massive split during assembly.  I bought some Titebond Extend just for this assembly. It worked out well. It's a bit runnier than anticipated but saved my hide in the end. When you are gluing up this many pins/tails you need as much open time as you can get (and I don't have any hide glue).

I'm satisfied with the results - there are a few small cracks here and there but overall things went together well - no blowouts or splits at the sides.  


Next up I will be cutting this huge box apart to form the doors. Unfortunately I took the above picture of the finish product after I cut the doors off.  That is why you don't see the two half pins next to each other.

Saturday, March 12, 2011

Tool Cabinet - Part 2 - Dovetails galore!

I've never done a dovetail carcass this large so I'm open to ALL suggestions and comments on my approach.  This is where my standard European woodworking bench shows it's shortcomings.  Clamping wide boards like this proves difficult.  On my short list to build is a Joseph Moxon Double-screw vice.  Or better yet, a Roubo Workbench.

I'm in the tails first camp.  Is that the Hatfields or the McCoys?  Oh, it doesn't matter, it's the right camp.  I don't usually do so but I created a story stick for laying out the tails. I did this because when the box is completely assembled I will be cutting it in half (so to speak) to form the doors. Thus, I created two half pins and a 1/8" saw kerf near the front of the box - you can see that in the first picture. I ganged both sides together so I could mark them at the same time (something else I don't usually do).


Here I'm just marking out the tails with dividers. I could have just projected the lines from the story stick but I like the divider holes in the endgrain so that when I pull off the story stick I can place my pen in the holes and using my dovetail marker mark the top and side of the tail at the same time.  I've adopted the Rob Cosman approach to dovetailing.  He is a superb teacher and following his step-by-step method makes this whole process seem a bit like cheating.


I threw this one in to show the scale of the sides. This sucka huge.  You can also see the drawers that I'm replacing with this cabinet behind the boards.  I actually had to get in one of these drawers after clamping all of this up.


All tails on both boards (top and bottom) have been marked out. I was taught to completely mark out your waste to avoid cutting mistakes. It takes a little longer but has never failed me yet (to this point anyways).


There is no great revelation in this picture but I wanted to throw it in so I can justify the quality of the final product.  It was very difficult to get in a good cutting posture with the boards as tall as they were. This isn't as important when cutting the tails. If you go off your line on the face of the board a little it isn't a big deal. However, when cutting the pins it sure was a challenge.


Here I'm just cutting out the waste with a fret saw. My saw was being difficult that day - I snapped 4 blades cutting out the pins and tails. I think in all of the dovetail work I've done in the last few years I may have broke two blades. I suspect they were getting hot because most of them snapped when I got near the last few tails/pins. Also, I was getting tired near the end and think I was rushing the cuts and putting too much pressure on the saw. Update:  I've since upgrade my fret saw to the Knew Concepts Saw.  What an absolute treat that saw is to use.


More to come on the dovetails.  My hands are cramping from all the sawing

Saturday, March 5, 2011

Roubo, Roubo, Wherefore art thou?

I've always been a fan of Andre Roubo.  We've been hanging out since the late18th century talking about the woodworking bloggers of the day.  Most threads have a common theme about the lack of power tools.  "How can we possibly rip such wide stock down it's length without a good 14" (with riser block) bandsaw?  Um, what's a bandsaw?  "It will be several years before someone invents it", Roubo says.

Ok, so my imagination gets the best of me while reading articles about Andre Roubo and his contribution to design and woodworking in general.  Just think, his woodworking bench designed in the 18th century still reigns supreme today.  It's hotter than Jordache jeans.  So, when my February issue of Popular Woodworking Magazine showed up on my doorstep I once again traveled back in time.  There were hints on the Pop. Wood blog there would be a Roubo sighting in the February 2011 issue.  They sure wouldn't disappoint.  Roy Underhill wrote an excellent article about Roubo's Folding Bookstand


Well my wife, who isn't a woodworking fan but lovingly supports my hobby (passion) seems to read my magazines before I do. She came across the folding bookstand article and immediately added it to my honey-do list.  You see, she has a passion of her own.  She reads blogs about building family relationships, loving one another, etc.  One such blog, I Take Joy is a daily read for her.  This is written by a wonderful lady who loves books and has provided such wisdom and direction to our family through books and blog that she thought it would be an appropriate gift.  Already signed-up for a conference she is hosting, my wife wanted me to build this bookstand so she could give it to her while there.  Well, trying my hand at this 'near all hand tool' project two days before she left (after procrastinating for over a month) proved interesting. 

A lot of you out there have been asking questions and wanting more (above and beyond the Popular Woodworking article) on how to make this stand; myself included.  Christopher Schwarz graciously posted a short video providing a few more clues into marking and cutting the hinges.  Although I'm not him, I took a shot at a more complete video on how to make this mysterious piece.  Growing up in a power tool world I'm still mastering my hand tool skills so don't cringe at my technique.  I hope you enjoy, and I certainly welcome your comments. 

A side note:  I built another bookstand after shooting this video and more closely followed Mr. Underhill's advice for rounding over the hinges instead of the MUCH easier 45-degree approach.  The end result (which is actually the gift we are giving) turned out much nicer.  If you are contemplating building one of these I suggest you go with the rounded hinges.  They are very pleasing to the eye and I'm sure your book will thank you.

The First Tool Cabinet Blog Ever...

... well, ok, maybe not.  But it is my first blog entry ever.  I actually started building this about a year ago and have taken a few pictures along the way (sorry, no video).  Well after a year's worth of effort (mostly on other projects) my children convinced me I should enter the 21st century and create a woodworking (v/b)log (is this another first?).  So here is my feeble attempt at blogging and vlogging and posting (oh my!).  Maybe I can hire them to do it while I continue working wood.

Anyways, I thought I would document my journey on making a tool cabinet for some of my hand tools. I'm making a modified version of a plan I found on Fine Woodworking. Most of my hand tools currently live in drawers under my bench. Initially, I thought this was a good idea but after building and using them they are rather inconvenient.  I can't use my holdfasts and can guarantee I will need to get in a drawer just as soon as I have a large panel clamped up in the perfect position to mark some pins (happened as I was making this cabinet).

So, like I said, I'm making a modified version of this tool chest found on Fine Woodworking. 


My drawer layout will be different and I won't have the internal door partitions.  That is a bit cluttered for my tastes.  Instead I'll be adding a smaller version of this plane cabinet found on Becksvoort's cabinet.  This will hold the longer planes that won't fit in the cubby holes (a Stanley No. 5 Type 11, a Lie-Nielsen No. 5 1/2, etc.)


So the work begins.  I decided to make the cabinet out of some African Mahogany I purchased some time back for a blanket chest I was going to make for the Mrs. There was a change of plans on the chest (using Walnut now) so the mahogany has been sitting in my shop (read garage) for a few years. I'm not really a big fan of some of the mahogany knock-offs (difficult to work with hand tools) so the wood is turning into shop furniture (albeit expensive shop furniture).


For the sides, top and bottom I have two 17" W x 8'L boards. The rough dimensions of the box are 37"W x 48"T x 16"D. In this photo I'm cutting one of the 8'L boards in half for the sides.


After the four pieces have been cut to size the edges need to be jointed. The handy-dandy LN #8 performs admirably.  This is one of my favorite planes.  Believe it or not it is a great shooter as well.


The box will be joined together with through dovetails all around (tails on the sides).  So, once all the edges have been straightened and squared (I did the cross-cut squaring on my TS - they are a bit too wide for the shooting board) I put a shallow rabbet on the inside faces of my sides (tail boards) - AKA the 140 trick. You've gotta love the cross-grain shavings you can get with a 140. This will later simplify registering the tails on the pin boards when marking.


The next post will document laying out and cutting the dovetails.  There are a lot of them so this will be great practice for some hand-cut dovetails.